fetch svn project without svn files and without deleting

I worked with any technologies and languages. Many times we need some folder or codebase for your new project.
So we need to copy old project code or folder in our new project. In rails we need many plugins for our project. Some times few plugins are not getting installed in our project.

fetch svn project without svn files and without deleting

Few days back i tried to install acts_as_solr plugin in my project. I got an error. So i coppied acts_as_solr plugin from my old project and pasted in new project.

When i tried to SVN commit the files in the new project. That files started commiting to Old project.
So i need to remove all .svn folders form all the subfolders. Than only i can add all the folder to new project.

I google around for solution. I found many ways:

  • Remove the all .svn folder from all subfolder.
  • Through linux command find all .svn file and delete. (but i think this harmful)
  • SVN export – command

SVN export is the very simple and reliable way to fetch project out of svn.
In windows, using svn export is very easy.

Paperclip with Rails for image manipulation

I used the spree e-Commerce CMS for checking or R&D of Spree code. Spree is the really nice and basic tool for e-Commerce CMS.

When i was going through Spree i got to know about paperclip plugin which is used for image manipulation. Earlier i used “attachment_fu” for image manipulation and file uploading in rails projects.

How to use “Paperclip

First install perperclip plugin to your project.

Windows and Linux user can use my code. (I used this in WindowsXP and Fedora 9)

#ruby script /plugin install https://svn.thoughtbot.com/plugins/paperclip/trunk/

through this command perperclip get installed in your project folder.

Many time you need photo upload functionality for customer

Here i used Customer contoller and Customer model for this lession

First run following command

#ruby script/generate paperclip ModelName FieldName

In my case command is:

#ruby script/generate paperclip Customer customer_pic

One migration file will be created through this command. Run that migration.

In Customer model file paste this code:

class Customer < ActiveRecord::Base
# Paperclip
has_attached_file :customer_pic,
:styles => {
:thumb=> "100x100#",
:small => "150x150>" }
end

Using this command you will save three pic(photo) in your system folder.

Default upload url of peperclip is (RAILS_ROOT/public/system/…)

You can use following lines in your model file. (copy & paste this code under styles code)

:url => “/uploads/:class/:attachment/:id/:style_:basename.:extension”,
:path => “:rails_root/public/uploads/:class/:attachment/:id/:style_:basename.:extension”

I added uploads folder front on :class. That is optional you can remove also.

If you are already having forms for customer and if you want to add that to form. Just use this code in your form tag.

:html => { :multipart => true

and in from <%= f.file_field :customer_pic%>

That sit. you need to add or use following code in View

<%= image_tag @user.customer_pic.url %>

<%= image_tag @user.customer_pic.url(:thumb) %>

Paperclip Validations

Here i giving some validation for Paperclip. You need to just copy & paste in to your model where you want to use image upload.

validates_attachment_content_type :avatar, :content_type => 'image/jpeg'

validates_attachment_presence :avatar

I found this plugin is very usefull for Me. It really saves lots of time.

Basic of Rails routing -rails routes basic hack

Here I am going to focus on only basic routing technic of Rails.

If you are new in rails. Just wanted to remind you.

First go to Rails project’s “public” folder and delete or rename the index.html file. If index.html file is there then default routing will not run.

If you want Users controller’s index page as a home page of site then go for this code in routes.rb file.

map.connect ”, { :controller => ‘users’, :action => ‘index’ }

In view you can use link for home page and logo of site(basic hack)

<%= link_to(“HOME”,{:controller=>’/’}) %>


ActiveRecord-JDBC is for use with JRuby only….

Few days back when i tred to run my rails project. I got an error saying

ActiveRecord-JDBC is for use with JRuby only
jdbc-mysql is only for use with JRuby
/usr/lib/ruby/gems/1.8/gems/activerecord-2.3.2/lib/active_record/connection_adapters/abstract/connection_specification.rb:76:in `establish_connection’: Please install the jdbcmysql adapter: `gem install activerecord-jdbcmysql-adapter` (no such file to load — java) (RuntimeError)
from /usr/lib/ruby/gems/1.8/gems/activerecord-2.3.2/lib/active_record/connection_adapters/abstract/connection_specification.rb:60:in `establish_connection’
from /usr/lib/ruby/gems/1.8/gems/activerecord-2.3.2/lib/active_record/connection_adapters/abstract/connection_specification.rb:55:in `establish_connection’
from /usr/lib/ruby/gems/1.8/gems/rails-2.3.2/lib/initializer.rb:417:in `initialize_database’
from /usr/lib/ruby/gems/1.8/gems/rails-2.3.2/lib/initializer.rb:141:in `process’
from /usr/lib/ruby/gems/1.8/gems/rails-2.3.2/lib/initializer.rb:113:in `send’
from /usr/lib/ruby/gems/1.8/gems/rails-2.3.2/lib/initializer.rb:113:in `run’
from /var/www/html/HOO/trunk/config/environment.rb:9
from /usr/lib/ruby/site_ruby/1.8/rubygems/custom_require.rb:31:in `gem_original_require’
from /usr/lib/ruby/site_ruby/1.8/rubygems/custom_require.rb:31:in `require’
from /usr/lib/ruby/gems/1.8/gems/activesupport-2.3.2/lib/active_support/dependencies.rb:156:in `require’
from /usr/lib/ruby/gems/1.8/gems/activesupport-2.3.2/lib/active_support/dependencies.rb:521:in `new_constants_in’
from /usr/lib/ruby/gems/1.8/gems/activesupport-2.3.2/lib/active_support/dependencies.rb:156:in `require’
from /usr/lib/ruby/gems/1.8/gems/rails-2.3.2/lib/commands/server.rb:84
from /usr/lib/ruby/site_ruby/1.8/rubygems/custom_require.rb:31:in `gem_original_require’
from /usr/lib/ruby/site_ruby/1.8/rubygems/custom_require.rb:31:in `require’

I am using Fedora 9 as Os and mysql as database.

I read all the error than i got to know. I need to change my database.yml file.

in that file i have following text;

adapter: jdbcmysql

i changed that to:

adapter: jdbcmysql

socket: /var/lib/mysql/mysql.sock

I thoutht jruby database issue but not. the database setting is an issue.

Fixed this issue: Building native extensions. This could take a while…

I got this error when i tried to install various ruby gems on system.

I am using the Fedoa 9 as OS.  I tried a lot to fix this issue and googled lot but not found exactly solution.

later on realize some of latest software are not installed on OS that’s why i am getting these kind of error.

you need to install proper software on Fedora box.

# yum install ruby ruby-libs ruby-mode ruby-rdoc ruby-irb ruby-ri ruby-docs

#yum install gcc-c++

this is the solution.


in page popup javascript or modalbox

in page popup javascript or modalbox, we got requirement to create in-page pop up in my project. we got many open source javascripts and CSS libraries.

in page popup javascript or modalbox

I got many open source javascripts and CSS libraries. I found some of them are useful. Here i given the list of libraries:

1.  lightbox2.04

Lightbox is a simple, unobtrusive script used to overlay images on the current page. It’s a snap to setup and works on all modern browsers.

URL: http://www.lokeshdhakar.com/projects/lightbox2/

My comments: useful for image slideshow.  Not useful for custom requirements.

2. modalbox_1.5.5

My comments: Very nice and simple, You can use this JS for multiple requirements.

URL : http://okonet.ru/projects/modalbox/

3. tinybox

My comments: simple and good, really tiny JS, you can modify and create custom events and effects.

URL: http://www.leigeber.com/2009/05/javascript-popup-box/

4. Good URL for Reference

http://www.emanueleferonato.com/2007/08/22/create-a-lightbox-effect-only-with-css-no-javascript-needed/

setting up basic authentication apache

Two months back, we got the requirement of do basic authentication for testing site server. We given steps and code for setting up basic authentication apache. So Google or any search engine site cannot index the testing sites.

setting up basic authentication apache

We are using Fedora as Operating System and Apache as web server on our testing machine. We hosted more than fifteen test sites on that server.

I successfully created basic authentication on server.

Use following commands:

#su

#ROOT_PASSWORD

#vi /etc/httpd/conf/httpd.conf

in that file you need to insert following lines.

AccessFileName htaccess.acl .htaccess
# htpasswd -c /home/USER/pwd.txt USER(you can define your user of stystem.)
New password: mypassword
Re-type new password: mypassword

That sit. Your username and password is set for popup.

Now you need to only create or update your .htaccess  file. You can create or find .htaccess file in your project folder.

Use or copy and paste following code in that file: (.htaccess file)

AuthUserFile /home/USER/pwd.txt
AuthName "Protected"
AuthType Basic


require valid-user

I following exact method for my server and projects. It is working perfect for me.

How to Use chkconfig command on fedora

chkconfig command is default command for linux versions.
chkconfig command is basically used for what is status when machine is rebooting. Startup of machine which services get started automatically.

For listing for services:
#su
#ROOT-PASSWORD
#chkconfig –list

If you want to add any service at startup:
# chkconfig –add nginx

If you want to turn on any service at startup:
#chkconfig nginx on

Stopping service
#chkconfig mysql off

install netbeans 6.7 on fedora 9

For installation of  netbeans package you need JDK 1.6 installed on your Fedora box. on Fedora 9 you are having already installed JDK 1.6 so you need to update the installation only.

Use following command for installing or updating JDK installation.

#su

#ROOT_PASSWORD

#yum update java-1.6.0-openjdk-devel

#yum install java-1.6.0-openjdk-devel
Than go to this URL (http://www.netbeans.org/downloads/index.html) and download the .sh file which you want install on your Fedora 9 box.

As per my view Netbeans supports for Rails and PHP and Netbeans is best IDE for Rails and PHP.

For Linux platforms, the installer file has the .sh extension. For these platforms, you need to make the installer files executable by using the following command:
#chmod +x netbeans-6.7.0-ml-ruby-linux.sh

This command i given for ruby IDE, you can choose your IDE or as per file name.

Than run the installer file

#netbeans-6.5.1-ml-ruby-linux.sh

That sit netbeans installtion will start to PC. After installation you can start netbeans from programming menu.

Internet connection on PC through mobile GPRS

Many people are suffering “How to connect Mobile GPRS to PC”. This question is about in all over the world. Who are new to use GPRS system and want to connect internet through mobile to PC.

Important Note: You need to install your mobile drivers and mobile modem drivers first.

You can download latest software or driver from relative site (PC suite for Nokia, Sony, motorola etc… mobile)

PC suite is having the mobile drivers as well as the modem drivers also. You need to install that software to your PC that sit. Than follow my steps:

I given the following steps to connect internet to PC using mobile GPRS or any GSM GPRS. I am using professional XP as Operating System.

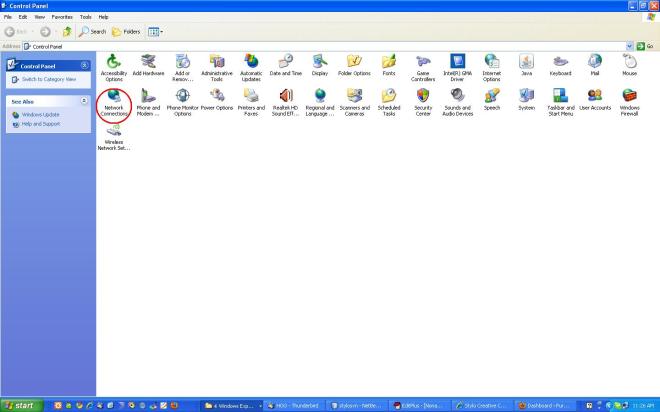
1. First click on start button and go to control panel

control panel

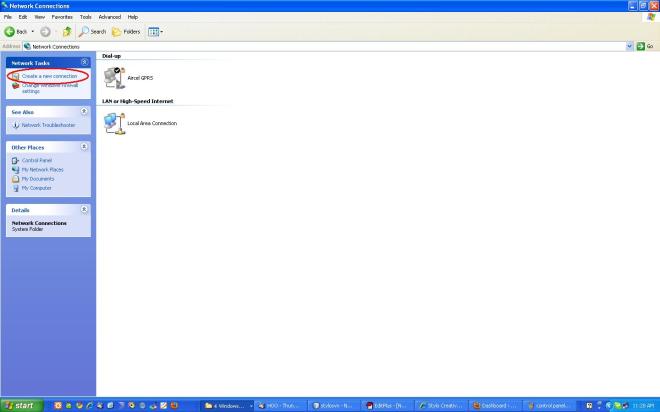
2. Click on Network Connections button.

new_connection

3. Click on Create a new connection button.

Than follow my steps as per my screens

nw1

nw3

New internet connection throguh mobile GPRS

You will get the Desktop Icon like this. You need to bubble click that Icon that sit. you are able to connect the GPRS internet connection.

GPRS connection icon on desktop

Some cases You need to insert the *99# number instead of *99**# dialing number. You need to select which is working for you.

For me *99**# number is working.