Turn of comment in wordpress site is easy. Using setting or plugin you can disable comments completely in wordpress. We will give simple steps for doing this.
disable comments in wordpress
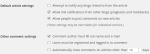
It is quite simple. Go to wordpress admin panel. Navigate to Setting->Discussion. First section will be “Default article settings“. We have three checkboxs there. Uncheck “” checkbox. It will look like as follows.
Settings >> Discussion >> uncheck “Allow people to post comments on new articles”
disable comments in wordpress
This setting change will comments “turned off” by default.
Note: This applies to new posts that you will publish from now on. To disallow comments from already publish posts:
Posts >> select them all and “Edit” under bulk actions and hit apply >> choose “do not allow” next to comments and hit update posts.
Solution: If you have old posts and pages and if you want to disable comments than use following wordpress plugin.
Allows administrators to globally disable comments on their site. Comments can be disabled according to post type. Multisite friendly.
disable comments wordpress plugin setting
This plugin allows administrators to globally disable comments on any post type (posts, pages, attachments, etc.) so that these settings cannot be overridden for individual posts. It also removes all comment-related fields from edit and quick-edit screens. On multisite installations, it can be used to disable comments on the entire network.
Additionally, comment-related items can be removed from the Dashboard, Widgets, the Admin Menu and the Admin Bar.
Important note: Use this plugin if you don’t want comments at all on your site (or on certain post types). Don’t use it if you want to selectively disable comments on individual posts – WordPress lets you do that anyway. If you don’t know how to disable comments on individual posts, there are instructions in the FAQ.
Securing pages of website is good for e-commerce sites. In wordpress we can secure pages using apache rule or other method but we will give simple trick. We chosen custom wordpress plugin solution.
With worpdress many people are using woo commerce plugin for E-commerce solution. It is really nice and easy to use. It has option for securing “Checkout” page. But for other pages we cannot use SSL option because of plugin limitations.
Secure transaction pages in wordpress
Using following wordpress free plugin you can secure selected wordpress pages.
WordPress HTTPS is intended to be an all-in-one solution to using SSL on WordPress sites.
Installation:
Upload the wordpress-https folder to the /wp-content/plugins/ directory.
Activate the plugin through the ‘Plugins’ menu in WordPress.
Navigate to the HTTPS settings page in the admin sidebar in the dashboard.
If you are using a non-default SSL Host for your HTTPS connection (e.g., a subdomain or shared SSL host) enter the entire secure URL into SSL Host. If your installation is located in a folder, you can choose to include it in the URL or not. If you set this to a domain that is not currently serving your WordPress installation over HTTPS and enable Force SSL Admin, you will lock yourself out of your dashboard. Follow instructions in the FAQ to reset the plugin.
If you would like connections to your admin panel to be secure, enable Force SSL Admin. If you are using a non-default SSL Host, do not use WordPress’ built-in FORCE_SSL_ADMIN or FORCE_SSL_LOGIN.
If you are looking to secure only your admin panel and/or posts and pages you specify, enable Force SSL Exclusively. This will ensure that any content not specified to be secure is always served over HTTP.
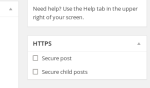
You can individually secure post and pages when editing them by updating the settings located in the HTTPS box on the right sidebar.
You can use simple text match or regular expressions to specify URL’s that should be secure using URL Filters in the WordPress HTTPS settings. Each filter should be on one line.
Setting Screen Shot:
Every Page or Post setting:
Secure transaction pages in wordpress
Go to Admin->HTTPS
wp-https-seucre-setting
Using worpdress https plugin, you can secure selected pages and posts. It is easy to use.
Note: If you are using wordpress https than do not use woo-commerce force SSL setting.
The ultimate benefits of the advanced Internet-enabled handy devices have interestingly gathered a gigantic user base. With more and more users switching to mobile devices, it has become more than imperative to sincerely consider the mobile audiences.
Although, there is no dearth of responsive WP themes that are great for targeting mobile devices in an efficient manner, but you may want to further enhance the mobile UX. If it is so, you can reap the benefits of the incredible plugins available in the WP repository that can ensure a mobile optimized look and feel to your WP site. Thus, by integrating such plugins in your site, you can create an outstanding mobile presence and efficiently cater to the needs of your mobile users.
This article will offer you a list of amazing plugins that are ideal for optimizing your mobile presence and deliver a conspicuous UX. Let’s have a glimpse into them.
Whether you want to implement any of the built-in themes or want to tailor the appearance of your site in a desired fashion, this premium plugin allows one to incorporate a mobile-friendly theme in their WP site. Along with easy customization, the iThemes Mobile facilitates one to integrate different themes to target different mobile platforms. That is, you can personalize your site’s visual appeal for different mobile platforms like Android, Windows phone, iOS and so forth.
This premium plugin comes complete with resourceful features like custom header uploader, four mobile-friendly themes, a style manager and a lot more. You can customize your WP site with great ease and efficiently cater to the needs of your mobile audiences.
Compatible with several mobile web browsers and mobile platforms, this plugin offers a complete control over the mobile version of your site. You can revamp it in a desired fashion while using the integrated tools. While ensuring easy customization, this free plugin also offers a responsive UI, effective sync with post, comments and pages, Google Analytics support, and a lot more. In fact, you can easily monetize your mobile presence with this plugin. Moreover, it also allows your mobile users to stay updated with your WP site’s feeds even when they are offline.
With an uncluttered theme, this plugin ensures that your mobile users can conveniently go through your site. This lightweight plugin is efficient enough to load instantly without annoying your viewers. You can also customize the visual appearance of your site as per your taste by implementing the utile features offered by this plugin. Whether you want to create custom backgrounds, menus, or header images, you can easily accomplish all and boost your visitor’s experience. Moreover, the integrated Akismet anti-spam, Single Sign On, etc., ensure that your site is always up and protected from vulnerabilities.
The WPtouch Mobile plugin represents your website content in a mobile-friendly fashion with a mobile-only theme. You can tinker with the visual appearance of your site and customize it in a desired fashion. It offers a plethora of features including, branding colors, language detection, and a lot of other styling options. This handy plugin is extremely simple to use, just install and activate it in your WP site, and your mobile-friendly site will be instantly created. Upon visiting your mobile site, visitors will get an option to either turn to the mobile-only theme or continue with your regular theme (that is the desktop theme). Although, this blissful plugin is available for free, but you may like to get the benefit of its additional offerings by investing in its pro version.
To ensure a blazingly high loading time to your site and use less bandwidth, this plugin offers truly amazing features. This plugin is well known for auto optimizing the website images to best fit the targeted mobile devices. It basically compresses all the media files and follow lossless approach, however, you can also go with a lossy optimization technique. Furthermore, this image optimizer plugin is also compatible with other common image gallery plugins.
These are the best WP plugins, which are popular for optimizing a WordPress site to ensure a remarkable mobile user experience. You may integrate any one of these and enhance your business value by efficiently reaching the giant mobile user base.
There are many ways to hide widgets from certain page in wordpress. Here we will give code sample and information about wordpress plugin which will be helpful to wordpress users to manage widgets in smarter way.
hide widgets on certain pages
There is manual and old way of hiding widgets on certain pages which is adding code in theme. You can get your page name or page id and use following code.
add_filter( 'widget_display_callback', 'hide_widget_pages', 10, 3 );
function hide_widget_pages( $instance, $widget, $args ) {
if ( $widget->id_base == 'pages' ) { // change 'pages' to widget name
if ( !is_page( 'contact' ) ) {    // change page name
return false;
}
}
}
You need to copy and paste above code into functions.php file (themes folder).
Now we will tell you about automatic and smart way. There is very nice and good wordpress plugin which will give you more options in widget so you can control your widget more smartly.
Change your sidebar content for different pages, categories, custom taxonomies, and WPML languages. Avoid creating multiple sidebars and duplicating widgets by adding check boxes to each widget in the admin (as long as it is written in the WordPress version 2.8 format) which will either show or hide the widgets on every site page. Great for avoiding extra coding and keeping your sidebars clean.
By default, ‘Hide on checked pages’ is selected with no boxes checked, so all current widgets will continue to display on all pages.
hide widgets on certain pages in wordpress
Above is screen shot of widget admin section. There are many options you can find for every widget. I found this plugin is very helpful to me.
There is option of hide widget for checked pages. You can check certain pages for hiding widgets. This is code free solution which i recommend for all wordpress users.
Blogging on WordPress, but afraid of bulking up your site and slowing it up? Here comes the good news: there are several plugins that can make your website faster than usual. Notably though, there are plugins that can also make your site slower. This is a no-no more so because Google considers page speed as an important ranking factor. Take a look at below.
P3 is a diagnostic plugin wherein it measures how each plugin in your website affects its load time. In most cases, your website have too many plugins or poorly configured plugins. The site is slow because of what are installed. The most common culprit is social sharing plugins which bloat page load speed.
When it comes to determining the overall performance of your site, you can use GTmetric for WordPress. The plugin tracks your installs and sends alerts whenever your website fails below pre-defined criteria. You can also schedule analysis and reporting on a frequency that is most convenient for you.
W3 Total Cache is very useful in leveraging browser caching. W3 Total Cache is considered the only WPO (WordPress Performance Optimization) framework that is specifically designed for the purpose of improving the site’s speed and thereby user experience (UX). This plugin increases server performance and reduces download times. It can be easily integrated with your content delivery network (CDN). GoDadddy and HostGator, among others, recommend the use of this plugin. Even Matt Cutts is using W3 Total Cache.
WP Super Cache performs the same function as W3 Total Cache. WP Super Cache generates static HTML files and serve to your site users. It diminishes the job to process comparatively heavier files such as PHP generated cache files.
If you want to cache database query, you can use DB Cache Reloaded Fix. This plugin uses less disk space and is extremely easy to use. Enable the plugin, pick a time and empty the filter. The plugin will not update, insert or delete.
Force Gzip speeds up load time by deploying a GZIP output compression action. The plugin can also detect when the browsers are erroneously claims that they are not supporting when they do in actuality. Compressing the ZIP file saves bandwidth and reduces the total file size, so that sending the file to the users will then be easier and faster.
The majority of the WordPress sites includes images that consume a significant portion of bandwidth, and the solution is WP Smush.it. The plugin automatically compresses these images upon upload on your media library without affecting the quality of the images. It optimizes JPEG compression and converts GIFs to PNGs. The best part, you can compress images stored in the library by running them through WP Smush.it.
EWWW Image Optimizer is an alternative to WP Smush.it. The plugin automatically optimizes the images while being uploaded in your library.
Hammy is a plugin that generates and serves responsive-oriented images to the users. The plugin resizes the image based on the available content area, but still depends on content width. With this, the users are served with the most appropriate image based on what device they are using. Hammy supports retina.
Another great plugin for saving bandwidth is BJ Lazy Load. Lazy loading means replacing the images, thumbnails, gravatars and even content iframes with placeholders. The contents will be loaded when the user gets close to the image, for instance, as he or she scrolls the page. BJ Lazy Load also works with widgets. For responsive designs, the plugin automatically serves scaled-down images. For hiDPI screens, it serves hiDPI images.
WordPress autosaves. Period. One disadvantage of such is that the database will be easily filled up with unnecessary files such as drafts, revisions, unapproved comments, trashed items and even pingbacks and trackbacks. WP-Optimize is a great plugin because it routinely clears your database. It will leave those that need to be kept. Potentially harmful cleanup options are highlighted in red. Backup your database before you use the plugin.
In optimizing WordPress database, you can use WP-DBManager alternatively. This plugin schedules database optimization dates. Aside from this, it also repairs, backups, restores and deletes backup database whenever necessary. It runs selected queries and drops or empties tables.
There are instances when we want to control what post revisions we can store. Again, WordPress autosaves your drafts and revisions which can be easily removed using Revision Control plugin. An unnecessary amount of drafted posts will be removed through setting the plugin to a minim of 3 revisions, for example. Enabling, disabling and limiting the number of provisions is possible on a per post basis. The plugin has Revisions Meta box which also allows users to delete specific revisions.
Speaking of backups, every blogger and website owner should backup their database. Install a plugin like Backup. Backups are in the form of zipped archives which will be then uploaded to any folder of your choice in Google Drive. What’s great about this plugin is you control what are being backed up such as database, files and directories. You can also schedule automatic backups if you want.
If the site has several plugins installed, your site would have about 15 separate style sheets and JavaScript files. The ideal scenario is having a single CSS file for all the style sheets and single JavaScript file for all the files. BWP Minify combines the sheets and files separately, so that the number of browser requests is minimized. The plugin can be customized and is available in 11 languages.
Another coder-friendly plugin is WP-Compress-HTML. When coding, spaces, new lines, new tabs, indentations and carriage returns are used to make the contents more human-readable. These are necessary to collaborate and debug HTML documents. Nonetheless, these elements add up to the HTML document file size. WP-Compress-HTML removes such elements of the HTML document. Another great thing about the plugin is the feature of marking areas of the template reserved for preserving white space.
Malware also slows down your website, and there are malwares that are very difficult to detect. To determine whether there are malicious codes on your site, you may choose to install Sucuri Scanner. This plugin is a security suite that audits security activities, monitors file integrity, scans remote malware, monitors blacklist, hardens effective security and acts on post-hack security. It notifies the owner in case of any attempts of security breach, for example.
Evidently, there are several plugins that you can use in speeding up your WordPress site. However, the rule of thumb is using a maximum of 10 plugins. Anything more than that will slow down your site, which defeats the purpose of installing these plugins in the first place. You can experiment to determine which plugins best suit your website.
WordPress has default admin top bar which has all features shortcuts. Here you will show you, how to change UI of worpdress admin bar using plugin.
change wordpress admin bar
You can fully disable worpdress admin bar but you will not able retrieve it. There is very nice wordpress plugin which will help you to hide default wordpress admin bar partially. Using this plugin you will get full control on behaviour of admin bar.
Admin Bar Button is a plugin that will create a simple button to replace the default WordPress Admin Bar on the front end. When using this plugin, the full height of the page is used by your site, which is particularly handy if you have fixed headers. Please see the Screenshots tab to see how the Admin Bar Button looks.
After activating the plugin, if you wish you can change how the Admin Bar Button looks and works by visiting the Settings page (Settings » Admin Bar Button). However, no user interaction is required by the plugin; if you wish, you can simply install and activate Admin Bar Button and it’ll work right away.
This plugin has been tested with the built in Twenty Fourteen, Twenty Thirteen and Twenty Twelve themes. Should you find a theme with which it does not work, please open a new topic on the Support tab.
For configuring the admin bar button, go to Settings » Admin Bar Button page. That setting page will look like as follows:
Admin Bar Button Settings WordPress
You will find two tabs in setting page which are so helpful. The first one is for admin bar button settings. You can edit button text, position, animation, etc.
We found this plugin so helpful for corporate site purpose.
If you want remove worpdpress admin bar than you can use following plugin.
disable wordpress admin bar for all user roles remove frontend backend code reduce memory consumption speedup loading control panel removal wp plugin clean dashboard menu for all subscribers. Is planned update for WordPress 3.8+ / 3.9+ / 4.0+ / 4.1+ compatibility? YES! The plugin that is updated, for now, is WP Toolbar Removal
Please noted that External CSS Style and JS Script support fot Adaptive Dasboard is developed offline on sLaNGjIs GitHub targeted for Version 2014.1210.0410 Build 2014-12-10
Your updates is manual (for now) when is available upgraded releases!
Periodically, the files included in the plugin will be updated with new releases: you are advised to periodically download the updated package based on the build date rather than on its version.
Rules:
Compatible with: WordPress, bbPress, Buddypress
Unified Coding to run with WordPress 3.1+ or later
WordPress will only lets you upload images (png, gif, jpg, pdf, etc). It does not allow to upload extra file type. Here in this article we given perfect solutions for adding extra file types. Some plugins and code for upload extra file type.
How to extra allow file type upload in wordpress
There are some nice wordpress plugin which will help you to add extra file types for upload.
The Ardent Pixels’Extended MIME Types plugin was created specifically for WPMS in mind. You can now allow all or only select blogs to upload a WIDE range of file types.
By default, WordPress only allows a very limited set of file types to be uploaded. This set is defined by a so called “white list”. What’s not on the white list can’t be uploaded.
This plugin allows you to extend this white list through a settings page.
Additionally it comes with a wide range of file types that are enabled automatically, like audio files (ac3, mp4, …) and video files (avi, mkv, …).
We tried many social share button wordpress plugin which add many js files. Guide for using fast loading css share button wordpress plugin with tips to use css share button plugin.
Why created CSS social share button WordPress plugin?
There are many plugins which are good looking and functionality wise advanced. But these plugin will slow down your wordpress site. Due to many javascript and CSS code these plugin take time to load. Social sharing plugins add images to your site pages which also cause slowness. So we decided to create fast loading and minimal CSS based share button.
How to install CSS Share Buttons?
Follow the usual routine;
Open WP admin – Plugins – Add New
Enter “CSS Share Buttons” under search and hit Enter
Plugin will show up as the first on the list, click “Install Now”
Or if needed, upload manually. Follow the steps below to install the plugin.
Upload the css-share-buttons directory to the /wp-content/plugins/directory
Activate the plugin through the ‘Plugins’ menu in wp
Go to “CSS Share” option to configure the button
What Features has CSS Share Buttons plugin
fast loading share button wordpress plugin
Facebook, Twitter, Google Plus and LinkedIn Share buttons.
The CSS Share Buttons easily allows your blog to be shared. Speedup you site with this share plugin.
fast loading share button wordpress plugin
This plugin is very light weight. As comapred to other Share button plugin This plugin is super fast.
We compared with all famous share button plugin. Our Plugin load CSS from CDN.
It show very lite share button only with HTML and CSS. It does not load any javascript like other We load only one CSS file with this plugin – only 1.5kb css file
FEATURES:
Share with Facebook.
Share with Twitter.
Share with LinkedIn.
Share with Google Plus.
Floating Sidebar
Responsive Design
Admin Setting of CSS Share button
admin setting of css share buttons wordpress plugin
CSS share button plugin is super fast. It does not load any javascript to your site. It adds only one CSS file (1.4kb). This plugin will increase your website speed. Which is good for SEO.
WordPress tutorial for, how to automatically interlinking wordpress articles using plugin. Interlinking is good to promote our websites old articles and SEO. Why interlinking articles on wordpress is important.
There are many plugins or code you can use in wordpress site. We suggest to use this plugin. This plugin does not create any table in database and automatically interlink your websites articles. Internal linking will reduce you websites bounce rate, as text will be interlinked automatically when you create new post or page.
how to automatically interlinking wordpress articles using plugin
SEO Smart Links provides automatic SEO benefits for your site in addition to custom keyword lists, nofollow and much more.
SEO Smart Links can automatically link keywords and phrases in your posts and comments with corresponding posts, pages, categories and tags on your blog.
Further SEO Smart links allows you to set up your own keywords and set of matching URLs. Finally SEO Smart links allows you to set nofollow attribute and open links in new window.
It is a perfect solution to get your blog posts interlinked or add affiliate links to other sites.
Everything happens completely transparent, and you can edit the options from the administration settings panel.
How to setup SEO Smart Links
how to automatically interlinking wordpress articles using plugin
Use above image for setting for seo smart link plugin. We are using this plugin in our blog for creating interlinking.
Here in wordpress tutorial, we will show you, how to wordpress force regenerate thumbnails and delete big images from website. Deleting unwanted old big sized images. This will save your servers disk space.
When we upload image to wordpress website, Actually wordpess uploads five images in backend. Which is unnecessary and unwanted. If your theme added, custom thumbnail sizes then it create more than five images and upload on server. There are many images which are unwanted so you can delete those images from your server using following trick.
wordpress force regenerate thumbnails delete big images
The EWWW Image Optimizer is a WordPress plugin that will automatically optimize your images as you upload them to your blog. It can optimize the images that you have already uploaded, convert your images automatically to the file format that will produce the smallest image size (make sure you read the WARNINGS), and optionally apply lossy reductions for PNG and JPG images.
Why use EWWW Image Optimizer?
Your pages will load faster. Smaller image sizes means faster page loads. This will make your visitors happy, and can increase ad revenue.
Faster backups. Smaller image sizes also means faster backups.
Less bandwidth usage. Optimizing your images can save you hundreds of KB per image, which means significantly less bandwidth usage.
Super fast. The plugin can run on your own server, so you don’t have to wait for a third party service to receive, process, and return your images. You can optimize hundreds of images in just a few minutes. PNG files take the longest, but you can adjust the settings for your situation.
Best JPG optimization. With JPEGmini integration, nothing else comes close (requires an API subscription).
Better PNG optimization. You can use pngout, optipng, and pngquant in conjunction.
Root access not needed Pre-compiled binaries are made available to install directly within the WordPress folder, and cloud optimization is provided for those who cannot run the binaries locally.
Optimize almost anything Using the Optimize More tool, and the wp_image_editor class extension, any image in WordPress can be optimized.
By default, EWWW Image Optimizer uses lossless optimization techniques, so your image quality will be exactly the same before and after the optimization. The only thing that will change is your file size. The one small exception to this is GIF animations. While the optimization is technically lossless, you will not be able to properly edit the animation again without performing an –unoptimize operation with gifsicle. The gif2png and jpg2png conversions are also lossless but the png2jpg process is not lossless. The lossy optimization for JPG and PNG files uses sophisticated algorithms to minimize perceptual quality loss, which is vastly different than setting a static quality/compression level.
EWWW Image Optimizer calls optimization utilities directly which is well suited to shared hosting situations where these utilities may already be installed. Pre-compiled binaries/executables are provided for optipng, gifsicle, pngquant, cwebp, and jpegtran. Pngout can be installed with one-click from the settings page. If none of that works, there is a cloud option that will work for those who cannot run the optimizers on their own server.
Bulk Optimize
There are two functions on the Bulk Optimize page. One is to optimize all images in the Media Library. The Scan and Optimize is for everything else. Officially supported galleries (GRAND FlaGallery and NextGEN) have their own Bulk Optimize pages.
Skips Previously Optimized Images
All optimized images are stored in the database so that the plugin does not attempt to re-optimize them unless they are modified. On the Bulk Optimize page you can view a list of already optimized images. You may additionally choose to remove individual images from the list, or use the Force optimize option to override the default behavior. The re-optimize links on the Media Library page also force the plugin to ignore the previous optimization status of images.
WP Image Editor
All images created by the built-in WP_Image_Editor class will be automatically optimized. Current implementations are GD, Imagick, and Gmagick. Images optimized via this class include Meta Slider, BuddyPress Activity Plus (thumbs), WP Retina 2x, Imsanity, Simple Image Sizes, Hammy, Animated GIF Resize and probably countless others. If you have a plugin that uses WP_Image_Editor (or are not sure) and would like EWWW IO to be able to optimize previous uploads, post a thread in the support forums.
Optimize Everything Else
Site admins can specify any folder within their wordpress folder to be optimized. The ‘Scan and Optimize’ option under Media->Bulk Optimize will optimize theme images, BuddyPress avatars, BuddyPress Activity Plus images, Meta Slider slides, WP Symposium images, GD bbPress attachments, Grand Media Galleries, and any user-specified folders. Additionally, this tool can run on an hourly basis via wp_cron to keep newly uploaded images optimized. Scheduled optimization should not be used for any plugin that uses the built-in WordPress image functions and it does NOT include Media Library images, because they are already optimized on upload.
NextGEN Gallery
Features optimization on upload capability, re-optimization, and bulk optimizing. The NextGEN Bulk Optimize function is located near the bottom of the NextGEN menu, and will optimize all images in all galleries. It is also possible to optimize groups of images in a gallery, or multiple galleries at once. NOTE: Does not optimize thumbnails on initial upload for legacy (1.9.x) versions of NextGEN, but instead provides a button to optimize thumbnails after uploading images. No further updates will be provided for NextGEN legacy support, use NextCellent instead.
NextCellent Gallery
Features all the same capability as NextGEN, and is the continuation of legacy (1.9.x) NextGEN support.
GRAND Flash Album Gallery
Features optimization on upload capability, re-optimization, and bulk optimizing. The Bulk Optimize function is located near the bottom of the FlAGallery menu, and will optimize all images in all galleries. It is also possible to optimize groups of images in a gallery, or multiple galleries at once.
Image Store
Uploads are automatically optimized. Look for Optimize under the Image Store (Galleries) menu to see status of optimization and for re-optimization and bulk-optimization options. Using the Bulk Optimization tool under Media Library automatically includes all Image Store uploads.