PurabTech is technical blog for Programmer and Coders
Author: Purab
I am Purab from India, Software development is my profession and teaching is my passion.
Programmers blog dedicated to the JAVA, Python, PHP, DevOps and Opensource Frameworks.
Purab's Github Repo
Youtube Chanel Video Tutorials
Connect to on LinkedIn
Webmaster verification is process which will enables some site management tools by provided by google, Bing and Yandex. Here we given full steps for Google, Bing Verify ownership with wordpress website.
Why website verification is important?
Site Verification will not increase your page rank or search results of your website, It will help you to optimize your website with SEO tools.
Verify your website
If you have custom sitemap XML then you should open webmaster account and tell search engine about your sitemap file. If you have sitemap.xml file in webroot still we recommend to submit your sitemap file to search engine.
Google, Bing Verify ownership with wordpress Website
Manual Process for Verify ownership with wordpress website
Google
Login to your Google Webmaster Account (if your website has Google Analytics, Google Adsense or Google Search, you can use the same Google account). If you don’t have one, you can create one for free on www.google.com/accounts.
On Google Webmaster Tools click ‘Verify this site’.
In the Verification method list, select ‘Meta tag’ and copy the part of the Meta tag code provided by Google that is inside content=”…”.
Google+ (the social network)
Make sure you have a link from your Google+ Page to your website. Easiest place to do this is in the “Recommended Links” section of your Google+ Page’s “About” tab.
Paste your Goggle+ Page ID number, which is part of the URL for your Page. For example, the URL for YWDs’s Page is https://plus.google.com/u/0/purabkharat/posts so our ID number is purabkharat.
In ‘Option 2 (Meta Tag Authentication)’ select copy the part of the Meta tag code provided by Bing that is inside content=”…”.
Pinterest
Go to your Pinterest page select “Settings”.
Scroll down to “Website”. Enter your website URL iinto the filed. Click the “Verify Website” button.
Click the link “Verify with a meta tag”. Copy the part of the Meta tag code provided by Pinterest that is inside content=”…”.
Automated Process for Verify ownership with wordpress website
Seo Meta Tags (https://wordpress.org/plugins/seo-meta-tags/)
This wordpress plugin gives facility to add Google, Bing Verify ownership with wordpress using WebMaster tool and meta tag added Social AuthorShip meta Tags added for Facebook, Twitter. You do not need to install too many plugin for wordpress SEO. You can just install SEO Meta tags plugin. It will handle all SEO aspects of your wordpress website.
Google, Bing Verify ownership with wordpress
First install SEO Meta Tags wordpress plugin. On right side menu you will find “Webmaster Tools” page. Add your meta tags here. It will add best of meta tags to you wordpress site. This plugin will add best of SEO meta tags to your wordpress website. It will boost your wordpress website SEO in two weeks.
Page bounce rate is many time discussed in many article. Here we shown, how to reduce bounce rate google analytics in wordpress. Showed tricks for reduce bounce rate. My site was having high bounce rate always. I tried many tricks for solving the issue. Then I read many article about bounce rate. how google analytics calculating bounce rate.
I was recently told that some people use event tracking to find a truer bounce rate. Yes. You can reduce bounce rate by using some adding some javascript event to wordpress site. I found nice wordpress plugin which will help us to reduce bounce rate.
how to reduce bounce rate google analytics in wordpress
how to reduce bounce rate google analytics in wordpress
Get the real Time On Site and Bounce Rate in Google Analytics. Google Analytics calculates the Time On Site based on the length of time between a user entering your site and their last page view. This won\’t give you the REAL Time on Site and Bounce Rate stats.
FEATURES
Old and new tracking codes are supported
Code placement choice between header and footer
Track page scrolls
Change time event frequency
Set maximum tracking time
Disable for administrator role
Worst case scenario A visitor is very interested in one of your pages and takes 2 minutes and 13 seconds to read the article. After this he bookmarks the page and leaves. This visitor stayed 2 minutes and 13 seconds on your page, but never interacted with it. To Google that is a bounce! And bounced visits are marked 0:00 Time on Site. Not fair, right?
Another bad scenario A visitor goes to your website and stays 1 minute and 11 seconds on the first page. Then, he goes to a second page where he stays 1 minute and 12 seconds. Without any interaction on this page, he leaves. Since Google doesn’t know how long your visitor stayed on the second page, Google will add only the time the visitor spent on the first page to Analytics. Not fair, right?
We installed this plugin and we found really good impact. Our websites bounce rate started reducing. It takes one or two weeks to see impact on google analytics page. Here In this article, we given screen shot of our google analytics page.
As a SEO specialist, We know the importance of h1 and h2 tag in wordpress website. Here we will show you, how to add h1 tag to wordpress homepage in theme code.
how to add h1 tag in wordpress homepage in theme
There are many custom wordpress themes which has poor SEO. We need check every aspect of SEO friendliness of wordpress theme. recently, we faced same issue with one of our site. When we checked the website in SEO doctor Firefox addon. We did not find h1 tag on homepage. We got the following message.
how to add h1 tag in wordpress homepage in theme
When, we checked message. We found following error.
“Fail”,”H1 tag”,”* You have no H1 tags” “Fail”,”H2 tag”,”* 10 H2 tags found before/without H1 (“Demo post 12″)”
Many custom developer talking about following solution. This will not display h1 to a visitor but will to a search engine.
But we are not agree with above solution. do not use above solution. Google and other search engine did not consider hidden text or very small font words.
Solution
On Home page, For post title tag you should h1 tag. If you use multiple h1 tags in single webpage, that is not harmful. You should use rel bookmark in tag. For home page use following code.
REL=Bookmark Bookmarks are used to provide direct links to key entry points into an extended document. The TITLE attribute may be used to label the bookmark. Several bookmarks may be defined in each document, and provide a means for orienting users in extended documents.
You can use style or classes as per your theme requirement. The h1 is used in header.php for Custom Logo / Site Title, so there should be a H1 there. But If you used only logo image and not used h1 tag on home page than above issue will happen. You can use multiple h1 tags in one webpage. You can check wordpress core themes and their code and refer it. It has best SEO practice followed.
In core wordpress themes, We can see multiple H1 tags with rel bookmark element. So you can use above code in your wordpress theme and increase your website SEO.
WordPress plugin tutorial, How to use Smart Posts Widget wordpress plugin. Complete installation guide and using with page builder plugin. Explored features of smart posts Widget. Smart widget has Unlimited features and options for showing posts or pages. It is fully compatible with responsive wordpress websites. We tested this plugin with responsive page designs and page builder.
If you are building corporate website than smart post widget is very helpful to you. Without coding knowledge you can show posts by category and tags. You can select custom post type for showing. You can choose post order as per your need.
How to install Smart Posts Widget?
Follow the usual routine;
Open WP admin – Plugins – Add New
Enter “Smart Posts Widget” under search and hit Enter
Plugin will show up as the first on the list, click “Install Now”
Or if needed, upload manually. Follow the steps below to install the plugin.
Upload the smart-posts directory to the /wp-content/plugins/directory
Activate the plugin through the ‘Plugins’ menu in wordpress
Go to “Smart Posts Widget” option to configure the button
How to use Smart Posts Widget wordpress plugin
After smart posts widget installation go to Appearance->Widgets section, You can see the Smart Posts widget. Drag and drop to sidebar or any place, where you want to show wordpress posts.
You will be able to see following options in widget.
How to use Smart Posts Widget wordpress plugin
This widget has following Features:
Features
Compatible with Page Builder
Filter by tags
Filter by categories
Custom Post type support
Set how many posts to show.
Filter by sticky posts
Option to change ordering of posts.
Select number of posts to display
Option to show post thumbnail & set dimension by width and height.
Display title
Option to show created post date.
Option to show updated post date.
Set which category posts
Display post author and link
Change excerpt length (in words)
Display post comment count
Display excerpt or full content
Option to make the widget title link to category or tag page.
Add text or HTML before and after posts list
Multiple widgets
Add custom CSS to widget
Order by post comments
Order by random posts
Order by created date
Order by post title
How to use Smart Posts Widget with Page Builder?
First install Page builder to your wordpress website. If you are already using page builder than go to create or edit pages. Click on page builder tab and add widget. You can see smart posts widget as shown.
smart post widget selection with page builder
You can Choose filters and post type as per your requirement. You can show all type of posts with order and filter. You can design your page as per your choice.
smart posts widget with page builder
Result will be as follows:
smart post widget result
If you want to see above page in action than visit Demo link.
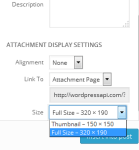
If you want to disable or remove default image sizes from wordpress theme. Than use code in them file. wordpress creates more than five images while upload.
remove default image sizes from wordpress theme
Every custom wordpress theme has their different thumbnail sizes defined. When we upload any image to wordpress, By default wordpress create four resized images. Means when we upload image, wordpress upload five images on server. Which is not necessary and unwanted. If your theme added, custom thumbnail sizes then it create more than five images and upload on server.
We used above code in our wordpress theme. Now while image upload, we are storing only three images on server. which saves the disk space.
If you want to remove unwanted image sizes from wordpress theme. Sometime you need the original and thumbanil image only. But many wordpress themes creates the multiple image version in your site which is not useful. Although it is possible to prevent the creation of default image sizes by changing their dimension settings to ’0′ in Dashboard > Settings > Media, these image sizes will still appear in the list of sizes in the Media Uploader.
Why use above method in wordpress theme
Due to custom thumbnail sizes your server images data will always increase. Some image sizes are not important for bloggers and website. So why to create unwanted images and store on server.
remove default image sizes from wordpress theme
You can always full sized image in website. Just fixing image sizes use following CSS code.
[viral-lock message=”Solution code is Hidden! It’s Visible for Users who Liked/Shared This article on Facebook or Twitter or Google+. Like or Tweet this article to reveal the content.”]
wordpress shortcodes are used in custom themes and plugins. so here in this wordpress tutorial, we will show, how to create custom shortcodes in wordpress theme.
Here using following code you can create simple shortcode. You just need to copy and paste following code in functions.php file (theme folder). If you cant to use shortcode for plugin then add this code in plugin file.
//[simple_shortcode]
function simple_shortcode_function( $atts ){
    return "foo and bar";
}
add_shortcode( 'simple_shortcode', 'simple_shortcode_function' );
Using attributes you can create short code as follows:
Above we created simple feedburner subscription short code. You can use above short code as follows:
[rssfeed_subscribe subtype=”RSS”]
Be sure to subscribe to future WordPress API updates
[/rssfeed_subscribe]
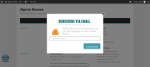
Here in this wordpress tutorial, we shown, how to add feedburner email subscription wordpress without plugin. Feedburner is free email subscription service by google feedbuner. You can open account using Feedbuner website.
Feedburner is free option, Feedburner is great email subscription tool, Still as compare to other paid services. Feedburner is good but I miss many features when I compare to other paid.
Why Email Subscription Popup is important.
There are many paid services offered email subscription popup functionality. They said, They will boost your your site visibility and subscribers. But you can get email subscription popup for free so, why need to pay. Google is given reputed feedburner service.
But not to worry, google still not going to stop feedburner email subscription free service.
add feedburner email subscription popup wordpress without plugin
Here we given code for creating feedburner subscription popup in your wordpress theme. You just need create subscription.php file in theme folder and put following code in that file.
Without writing too much, we given code. If you want to download script and images which are used in script, than use following URL.
[viral-lock message=”Download Link is Hidden! It’s Visible for Users who Liked/Shared This article on Facebook or Twitter or Google+. Like or Tweet this article to reveal the content.”]
Broken links are harmful for wordpress website SEO. In wordpress tutorial, will show you, how to check broken links in wordpress. How to fix broken links. Broken links are bad and annoying, Broken links will give the bad impression to user about your wordpress website.
Why Broken links are not good for SEO.
Hare are Google listed Webmaster Guidelines, you can clearly see that broken links are mentioned in guidelines. Google is mentioned about broken links. Check “Design and content guidelines” section. Google clearly says following point.
Check for broken links and correct HTML.
If Google is giving guidelines about broken links than, it is so important we should check broken links in wordpress and fix or remove broken links from wordpress site. Google actually penalized webpages which has broken links and it affect your search engine page rank.
How Broken links will be generated on wordpress website?
Main reason behind broken links which we found is, comments. Many commenter use fake domain names and URLs which does not exists. So while approving comment, check URL which posted by user. Another reason is wordpress themes. Many people change their wordpress themes. Some times, when theme has different custom image sizes are used in theme, Images are not found which are specified in theme. So whenever you change your wordpress theme, check images are not broken.
Some time you use reference URLs in wordpress site. If webmaster shut down their sites than reference URL will be broken. So you need to check broken URLs on regular basis.
We recommend to check broken URLs at least in one month.
how to check broken links in wordpress website
We found useful wordpress plugin for checking and fixing broken links. You need to install following wordpress plugin.
This plugin will check your posts, comments and other content for broken links and missing images, and notify you if any are found. This plugin will monitor your blog looking for broken links and let you know if any are found.
Features
Monitors links in your posts, pages, comments, the blogroll, and custom fields (optional).
Detects links that don’t work, missing images and redirects.
Notifies you either via the Dashboard or by email.
Makes broken links display differently in posts (optional).
Prevents search engines from following broken links (optional).
You can search and filter links by URL, anchor text and so on.
Links can be edited directly from the plugin’s page, without manually updating each post.
Highly configurable.
How to Use Broken link checker plugin
After activating the plugin, go to Tools » Link Checker. plugin will work in background and find out the website has broken links. If you have the large amount of posts than it will take some time depending on your server capability.
If your site has no broken links than you will see following screenshot.
How to Use Broken link checker plugin
If you site has broken links then you will see following result. In this screen shot we shown you how to fix broken links. There are some options can be found for each list item. Following are options.
Edit link
Unlink
Not Broken
Dismiss
how to check broken links in wordpress
You can choose option which you want. From list page you can edit URL and fix link. If URL not exist than you can unlink URL.
After you are fixing of all broken links. You can disable this wordpress plugin and After one month you can again process same thing. This will increase your website page ranking and users will not get bad impression about your wordpress website.
Many times we need older version wordpress plugin and themes for old project. Some times due backward compatibility issue we need older version of wordpress plugins which are supported to older wordpress themes.
download older version wordpress plugin and themes
Here we will show you show how to download older version. First go to wordpress plugin directory page.
Than search for plugin which you want to download. Go to plugin landing page and click on “Developers” tab. This tab will be last tab on this plugin landing page.
download older version wordpress plugin and themes1
Here we given sample image for download older version.
You will be able to see the all all older versions of that plugin. Under “Other Versions” section we will be able found all older versions.
Why older versions are needed?
Many times we need older version wordpress plugin and themes for clients which are using old wordpress version for their project. Some times we observed, After becoming wordpress plugin so much popular, some plugin developer started the pro version which is paid version. For plugins paid version you need pay. In newer version they removes and limits the functionality to attract the users. You can find all functionality in older wordpress plugin and you do not need pay money for this. You will get all functionality without paying money.
How to check Plugin version Compatibility
For checking older plugin Compatibility with your wordpress version. you need to select your wordpress version in “Compatibility” section and then select older version of plugin. You will able to see the “Not enough data” or “Works!” status. This is how you can check older plugin is compatible with your wordpress version.
This is very useful when you are working with customers who are using the older wordpress versions for their websites.
As per wordpress pages, we can limit number of wordpress posts in rss feed. Through RSS feed (feedburner and other feeds) we can subscribe to any website. RSS feed need to managed properly and shown to user. Some client and webmaster want to show limited nuber of post to user in RSS feed view, It is encourage-able to visitors to view your site.
how to limit number of wordpress posts in rss feed
What you need is, First login to worpdress admin panel. Than go to Settings » Reading page in your WordPress admin dashboard menu (left side).
WordPress itself given you facility to control RSS feed post numbers through wordpress admin panel itself.
[viral-lock message=”Setting image is Hidden! It’s Visible for Users who Liked/Shared This article on Facebook or Twitter or Google+. Like or Tweet this article to reveal the content.”]
how to limit number of wordpress posts in rss feed
[/viral-lock]
After this, Find ‘Syndication feeds show the most recent’textbox option and change the value(number) which you want to be shown to user in RSS feed page.
You will find “For each article in a feed, show ” radio box there, Choose option what you want to show to user in RSS feed. We suggest you to use “Summary” because it will be good for SEO purpose. Than Just save the changes.
Than go to your RSS feed page. If you dont know RSS feed page than use following link. Do not forget to change the your domain name.