If you want to disable or remove default image sizes from wordpress theme. Than use code in them file. wordpress creates more than five images while upload.
remove default image sizes from wordpress theme
Every custom wordpress theme has their different thumbnail sizes defined. When we upload any image to wordpress, By default wordpress create four resized images. Means when we upload image, wordpress upload five images on server. Which is not necessary and unwanted. If your theme added, custom thumbnail sizes then it create more than five images and upload on server.
We used above code in our wordpress theme. Now while image upload, we are storing only three images on server. which saves the disk space.
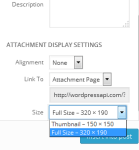
If you want to remove unwanted image sizes from wordpress theme. Sometime you need the original and thumbanil image only. But many wordpress themes creates the multiple image version in your site which is not useful. Although it is possible to prevent the creation of default image sizes by changing their dimension settings to ’0′ in Dashboard > Settings > Media, these image sizes will still appear in the list of sizes in the Media Uploader.
Why use above method in wordpress theme
Due to custom thumbnail sizes your server images data will always increase. Some image sizes are not important for bloggers and website. So why to create unwanted images and store on server.
remove default image sizes from wordpress theme
You can always full sized image in website. Just fixing image sizes use following CSS code.
[viral-lock message=”Solution code is Hidden! It’s Visible for Users who Liked/Shared This article on Facebook or Twitter or Google+. Like or Tweet this article to reveal the content.”]
wordpress shortcodes are used in custom themes and plugins. so here in this wordpress tutorial, we will show, how to create custom shortcodes in wordpress theme.
Here using following code you can create simple shortcode. You just need to copy and paste following code in functions.php file (theme folder). If you cant to use shortcode for plugin then add this code in plugin file.
//[simple_shortcode]
function simple_shortcode_function( $atts ){
    return "foo and bar";
}
add_shortcode( 'simple_shortcode', 'simple_shortcode_function' );
Using attributes you can create short code as follows:
Above we created simple feedburner subscription short code. You can use above short code as follows:
[rssfeed_subscribe subtype=”RSS”]
Be sure to subscribe to future WordPress API updates
[/rssfeed_subscribe]
Here in this wordpress tutorial, we shown, how to add feedburner email subscription wordpress without plugin. Feedburner is free email subscription service by google feedbuner. You can open account using Feedbuner website.
Feedburner is free option, Feedburner is great email subscription tool, Still as compare to other paid services. Feedburner is good but I miss many features when I compare to other paid.
Why Email Subscription Popup is important.
There are many paid services offered email subscription popup functionality. They said, They will boost your your site visibility and subscribers. But you can get email subscription popup for free so, why need to pay. Google is given reputed feedburner service.
But not to worry, google still not going to stop feedburner email subscription free service.
add feedburner email subscription popup wordpress without plugin
Here we given code for creating feedburner subscription popup in your wordpress theme. You just need create subscription.php file in theme folder and put following code in that file.
Without writing too much, we given code. If you want to download script and images which are used in script, than use following URL.
[viral-lock message=”Download Link is Hidden! It’s Visible for Users who Liked/Shared This article on Facebook or Twitter or Google+. Like or Tweet this article to reveal the content.”]
Broken links are harmful for wordpress website SEO. In wordpress tutorial, will show you, how to check broken links in wordpress. How to fix broken links. Broken links are bad and annoying, Broken links will give the bad impression to user about your wordpress website.
Why Broken links are not good for SEO.
Hare are Google listed Webmaster Guidelines, you can clearly see that broken links are mentioned in guidelines. Google is mentioned about broken links. Check “Design and content guidelines” section. Google clearly says following point.
Check for broken links and correct HTML.
If Google is giving guidelines about broken links than, it is so important we should check broken links in wordpress and fix or remove broken links from wordpress site. Google actually penalized webpages which has broken links and it affect your search engine page rank.
How Broken links will be generated on wordpress website?
Main reason behind broken links which we found is, comments. Many commenter use fake domain names and URLs which does not exists. So while approving comment, check URL which posted by user. Another reason is wordpress themes. Many people change their wordpress themes. Some times, when theme has different custom image sizes are used in theme, Images are not found which are specified in theme. So whenever you change your wordpress theme, check images are not broken.
Some time you use reference URLs in wordpress site. If webmaster shut down their sites than reference URL will be broken. So you need to check broken URLs on regular basis.
We recommend to check broken URLs at least in one month.
how to check broken links in wordpress website
We found useful wordpress plugin for checking and fixing broken links. You need to install following wordpress plugin.
This plugin will check your posts, comments and other content for broken links and missing images, and notify you if any are found. This plugin will monitor your blog looking for broken links and let you know if any are found.
Features
Monitors links in your posts, pages, comments, the blogroll, and custom fields (optional).
Detects links that don’t work, missing images and redirects.
Notifies you either via the Dashboard or by email.
Makes broken links display differently in posts (optional).
Prevents search engines from following broken links (optional).
You can search and filter links by URL, anchor text and so on.
Links can be edited directly from the plugin’s page, without manually updating each post.
Highly configurable.
How to Use Broken link checker plugin
After activating the plugin, go to Tools » Link Checker. plugin will work in background and find out the website has broken links. If you have the large amount of posts than it will take some time depending on your server capability.
If your site has no broken links than you will see following screenshot.
How to Use Broken link checker plugin
If you site has broken links then you will see following result. In this screen shot we shown you how to fix broken links. There are some options can be found for each list item. Following are options.
Edit link
Unlink
Not Broken
Dismiss
how to check broken links in wordpress
You can choose option which you want. From list page you can edit URL and fix link. If URL not exist than you can unlink URL.
After you are fixing of all broken links. You can disable this wordpress plugin and After one month you can again process same thing. This will increase your website page ranking and users will not get bad impression about your wordpress website.
As per wordpress pages, we can limit number of wordpress posts in rss feed. Through RSS feed (feedburner and other feeds) we can subscribe to any website. RSS feed need to managed properly and shown to user. Some client and webmaster want to show limited nuber of post to user in RSS feed view, It is encourage-able to visitors to view your site.
how to limit number of wordpress posts in rss feed
What you need is, First login to worpdress admin panel. Than go to Settings » Reading page in your WordPress admin dashboard menu (left side).
WordPress itself given you facility to control RSS feed post numbers through wordpress admin panel itself.
[viral-lock message=”Setting image is Hidden! It’s Visible for Users who Liked/Shared This article on Facebook or Twitter or Google+. Like or Tweet this article to reveal the content.”]
how to limit number of wordpress posts in rss feed
[/viral-lock]
After this, Find ‘Syndication feeds show the most recent’textbox option and change the value(number) which you want to be shown to user in RSS feed page.
You will find “For each article in a feed, show ” radio box there, Choose option what you want to show to user in RSS feed. We suggest you to use “Summary” because it will be good for SEO purpose. Than Just save the changes.
Than go to your RSS feed page. If you dont know RSS feed page than use following link. Do not forget to change the your domain name.
There are many caching solution available in open source. But Varnish is best in among. In this article, We given full steps to use and install varnish with wordpress and apache server . varnish setup with your wordpress site. Many website webmasters installed Varnish on their production servers to handle millions of requests without delay in response. There are many caching plugin like W3 Total Cache, WP Super Cache, Hyper Cache and so many..
Varnish is free open source software licensed under a two-clause BSD licence aimed to really super boost server performance. In short, it will work as web accelerator between any server that speaks with HTTP (Apache or any other).
how to install varnish with wordpress and apache
Why Apache or Nginx is Enough to Handle Huge Traffic
Many system administrator do many tricks with Apache because it performs really bad when the server is getting very high requests. Some people started using other servers like Ngnix and LiteSpeed. WordPress itself are using Ngnix server for many years for production environment. But still performance and response time of website is not that much fast with these plugins. So Best solution is Varnich Cache.
Varnish Explained Here
Vanish server started working on top of Apache server. When HTTP request comes to server first it will go the varnish server, If Vanish server has the response in memory cache then it will give response immediately, If Varnish server does not has cache for that request then it will go to apache server and get the response and keep in cache. Next request will delivered by Varinish cache, which will be so fast. Using varnish cache you can increase your server performance and response time by 300 to 900x. I personally checked response time difference. Before installing varnish cache my server response time was 3.46 second. After installing Varnish Cache, my server response time was 0.3, Means My server response increased by 1000x.
In following diagram, we explained, how varnish server process request.
varnish processing request compressed, how to install varnish with wordpress and apache
Why install varnish with wordpress
It will reduce server load , by reducing CPU work
It will load your load your WordPress website very fast, because vanish cache stored in RAM.
Your wordpress site SEO will increase, Because your site will load so fast
Response time will reduce by 1000x
Google page speed response score improves by at-least 20%
how to install varnish with wordpress and apache
Note: You can use this tutorial for setup varnish with any apache website. If you used HTML, ROR, JAVA, PHP for your website than you can set up varinish as we shown in this article. Here, we are assuming you already installed wordpress with apache server on linux server.
We are using dedicated Linux (centos) server for hosting our sites. So here we given steps can be applicable for Red Hat, Centos, Fedora, ubuntu server. But for ubuntu server you need use “apt-get install” instead of yum install.
So now Just follow my steps to install the varnish server. For latest version of Linux, you don’t need to install repository. But for older linux version you need to install the Varnish server repository. For that use following command to install varnish repository.
Than you will be ready for install varnish server. Use following command for installing varnish server. You need to run following command as root. So first became root.
yum install varnish
Configure Varnish to work on port 80
usually Apache run on port 80 and your all sites will run on port 80. So as I told you earlier in this article. (check Varnish Explained section) Varnish work on top of apache server So you need to set up varnish on port 80. In CentOS, RedHat, Fedora, and Ubuntu server, Varnish configuration file located in “/etc/sysconfig/varnish”. You can edit file using vim or vi editor or you can download file to your PC and edit it then upload to server.
I am using vim here.
vim /etc/sysconfig/varnish
Please change files first part code as per I shown in image. OR you can download setting file from here:
[viral-lock message=”Download Link is Hidden! It’s Visible for Users who Liked/Shared This article on Facebook or Twitter or Google+. Like or Tweet this article to reveal the content.”]
Got to “Alternative 2” section and change setting as I shown in image. Un-comment all the lines after “Alternative 2” as I shown.
By default -s setting will be pointed to filesystem, change that to memory. This is important, because we want, varnish give response from memory.
you need to change “-a : 6081 \” to “-a : 80 \” as we shown here in image. You can change “256m” to higher number, which is depends on your server configuration. If you have higher memory server then you can 512mb or 1GB for Varnish server. Many websites are using 4gb for varinsh servers. But they have a huge amount of traffic.
varnish configuration, install varnish with wordpress and apache
Second Part of configuration – go to end of file, using “shit+g” key. Change configuration as per I shown.
Got to “Alternative 3” section and change setting as I shown in image. Comment all the lines after “Alternative 3”
varnish default config , install varnish with wordpress and apache
Change server config of Varnish
Like Apache server, Varnish server VCL file found in “/etc/varnish/default.vcl” location. Varnish VCL file is configuration for looking for apache(server) response data(content). You can edit this file using vim editor as per shown in following image OR you can download file from following location.
[viral-lock message=”Download Link is Hidden! It’s Visible for Users who Liked/Shared This article on Facebook or Twitter or Google+. Like or Tweet this article to reveal the content.”]
varnish server config, install varnish with wordpress and apache
Change the port 80 to 8080 port as We shown in image. Means Varnish server will generate cache from port 8080 so you need configure your apache server on port 8080.
Now Varnish configuration is complete. Now we need to configure apache server to send apache in back of varnish server.
You need to change following setting of your apache server. By default apache config file is htttpd.conf or apache.conf file. You will find this file in “/etc/httpd/conf/httpd.conf” location. For ubuntu that will be other location. Open your apache config file.
You can download apache configuration file from here. You can refer only “custom.conf” file. it has all changed configuration.
We created custom.conf file and added under “/etc/httpd/conf.d/” folder. So that file will be automatically loaded in apache config.
You can add following code in your apache configuration file as we shown in following image. You need to change the NameVirtualHost 80 to 8080. So your apache server will run on port 8080.
apache server config with varnish, install varnish with wordpress and apache
You need to change VirtualHost entries for each of your domain. This is very important, If you do not change this properly then your apache server will through error while restarting.
Now your Varnish and Apache configuration are done. So time to restart both servers.
First Stop the Apache server and start the Varnish server. After starting Varnish server. Again start the apache server. You can use following commands step by step. Use commands in following order.
service httpd stop

service varnish start

service httpd start
Note: If you try to start varnish server without stopping apache server then it will never start because it will try to start using port 80.
Test Website performance and response time
How can you test your site pages speed and response time. Go to following “Google pagespeed” URL to test the website response time.
Check Varnish service is running for your site. go to following URL and add your website URL in inputbox and select “service scan” checkbox and click on go button.
You will get response as shown in following image.
As per explained in this article. After varnish configuration, your website will perform much faster then earlier and server CPU will not be consumed by apache server. We are using small dedicated server so we used only 256mb memory. If you have 1gb RAM of our server then use 256mb means one-fourth of memory for varnish server. When you have all code and database of same server.
Varnish Useful commands
# varnishlog : Provides detailed information on requests.
# varnishtop : It reads varnishd shared memory logs and presents a most commonly occurring log entries.
# varnishadm : Command-line varnish administration used to reload vcl and purge urls.
# varnishstat : Provides all the info you need to spot cache misses and errors.
# varnishhist : Provides a histogram view of cache hits/misses.
By “varnishstat” command you can check real-time statistics of varnish server. You can see following items
Client connection
Hit rate ration
Hit rate average
Number of client connections accepted
Following is screenshot of my production site. There are a lot of useful data provided by varnish stats
varnish varnishstat, install varnish with wordpress and apache
Create Varnish Log File
Using following command you can create varnish request log file as per apache log file. In this file you will get similar information like apache access log.
varnishncsa -c -a -d -w /var/log/varnish/varnish.log
For more varnish commands you can go to varnish site using following URL.
Now you are set with varnish server and wordpress site. Above article can be used for any linux distribution like, Fedora, Ubuntu, Centos, RedHat and Suse. Commands will be same and configuration will be same.
In wordpress configuration you do not need to change anything. With Varnish server .htaccess file will not break because still main webserver is apache.
If you still need assistance to install Varnish server and configure production server then contact to me.
Google analytics became primary requirement of every websites. Google analytics provides every aspect of data with all type of user behavior and information. Where from user came to your site. How much time user spends on user website. which pages are most popular in your website.
Similarly wordpress is widely used for creating websites. So here in this article I will show you how to add google analytics in wordpress footer.
how to add google analytics to wordpress footer
Need google analytics account
First you need the google analytics account, If you don’t have than, Go to the Google Analytics site and create a new account. There are many sites or check for YouTube video for getting the google analytics code from site.
Add Google Analytics script to Your WordPress Theme
Login to wordpress admin panel, Then goto “Appearance->editor” section. Then open footer.php file in editor. Before “” close tag put your google analytices code there. After adding analytics code save the file.
how to add google analytics to wordpress footer
This is easiest step to add the google analytics to your wordpress theme.
There are many plugins which will give you facility to add google analytics to your wordpress site. Here we recommend you to use following wordpress plugin for adding the google analytics.
The razmataz of the WordPress realm continues to beam and grow at an unprecedented rate as more and more webmasters lean towards it, choosing to host their blog on a CMS platform that gives them the maximum room to innovate and ideate. WordPress fits the fill, ever so obligingly.
Pre-Coding Homework You what to do
Pre-Coding Homework You what to do
Now, there are folks who would rather develop their own WordPress theme rather than going in with the deluge of free and paid themes that are available on on the web. And they do draw a lot of confidence from their exceptional coding abilities. Besides, they want their own name up there on WordPress.org as a theme contributor. But, is a darn too coding procedure all that there is to developing an impressive WordPress theme? Arguably not.
There are hordes of things for you to consider before you begin writing the codes, and this is what this article aims to introduce you with:
To Begin With
With increasing number of developments making their way into the WordPress ambit, creating your own WordPress theme is becoming easier by the day. The standard way of starting to building a theme is having an index.php and style.css file and you are good to go.
That said, is that all you need when the agenda is to stand out from the herd? Not really. What you need is to branch out to the seemingly uncharted territories and strive to innovate. And this is where you would need a comprehensive knowledge of HTML and CSS so that you can dig in your heels deeper and get down to the fibre of theme development. Having hands-on expertise in HTML5 and CSS3 is what would make difference at the end of the day. Working on WordPress becomes an exercise with much-greater benefits once you know your way around these two tools.
Furthermore, you need to be clear-eyed about the fact that your theme should create no compatibility hassles with the latest versions of WordPress (upgrading to which is critically important at all times). Besides, the plugins you wish to install should work in perfect unison with your theme.
Chart Out Your Tasks Well in Advance
As iterated earlier, theme development goes beyond coding. And there are a bunch of considerations to keep in mind. You should have time as luxury for:
Constantly upgrading the theme and applying patches to it
Be responsive to the customer issues
Ensure theme maintainability at all times
What would rather serve you the best is a detailed study of the WordPress documentation.
Look at Few Themes for the Influence and Know Your Files
There are some exceptionally impressive and inspiration WordPress themes out there to learn from. I won’t mention any specific as it would rather serve you better if you do a fair bit of research and get a diversified idea.
Now, there are files that form the very fibre of any WordPress website. Get to know them:
index.php
single.php
page.php
style.css
functions.php
search.php
header.php
sidebar.php
footer.php
archive.php
comments.php
404.php
Evidently, any Wordpres theme consists of a diverse range of PHP template files and you have to get them in order for every element of your theme to work appropriately.
Coming back to the documentation and the WordPress submission guidelines, make sure you don’t skimp over the basic ones.
The APIs Will Help You Sail Through
The basic process of writing a WordPress theme has to be accompanied with knowing the APIs inside out. The APIs cover several aspects of theme development and having a clear-eyed idea of how they would assist you in deliverables like theme customization, widgets, shortcodes, among others, will go a long way in streamlining your exercise.
….andthathastobefollowedby
You would need to be sure about elements like licensing and the architecure. Now you can use any of the several services that provide you with necessary tools to create themes without worrying about APIs, compatibility, licensing, etc. that is, if you are willing to spend a bomb. Note: avoid using the theme generators, as they are more often than not rejected by WordPress.org
Let your theme development endeavor have a sense of order and half the ground is covered. For the rest of it, your coding talent should suffice.
Many times you do not need the many image sizes for wordpress. You need the original image only for your wordpress sites. Sometime you need the original and thumbanil image only. But many wordpress themes creates the multiple image version in your site which is not useful. Using following code you can remove the unwanted images while uploading the images.
Here in this article I going to show you, how we can remove unwanted image sizes from wordpress theme. Using code snippet, you can easily remove unwanted image sizes.
remove unwanted image sizes
You just need to add following code into functions.php file.
In linux OS and windows OS cron jobs been used for backgroud tasks, many times you need to execute the some background tasks based on time. In wordpress creating the cron jobs is very easy. For creating the cronjob you can use the wp_schedule_event() event. You can run the cron based on time defined.
In linux and mac box adding cronjobs are different then using in wordpress. WordPress itself supports the adding cronjobs events or tasks. Here in this article I explained about using cron job with WordPress.
CRON job with WordPress
You can pass following parameters:
hourly
twicedaily
daily
<?php
add_action('wpapi_hourly_event', 'do_this_daily');

function wpapi_activation() {
    if ( !wp_next_scheduled( 'wpapi_hourly_event' ) ) {
        wp_schedule_event(time(), 'daily', 'wpapi_daily_event');
    }
}
add_action('wp', 'wpapi_activation');

function do_this_hourly() {
    // do something daily
}
?>
cron job with WordPress
For more detailed information you can visit
http://codex.wordpress.org/Function_Reference/wp_schedule_event