Blog Optimization Tips Every Blogger Must Know About

WordPress has proven a resourceful tool for bloggers, helping them build blogs that can be easily customized based on their preferences. With WordPress, you can set up your online blog for free. And, the best part is that you don’t even need to spend time in designing the layout for your blogging site or page, as you get access to plenty of pre-built WordPress themes – that enables to build a WordPress blog in no time. In addition, there are several great plugins that helps in adding advanced features to your blog design.

 WordPress Blog Optimization Tips Every Blogger Must Know About

But remember that, no matter how great your blog may look, it will still drive away your visitors if it is slow. In fact, your blog readers won’t take a second and will click the exit button, even if your blog takes 3 seconds to load. Through this post, I will share some easy-to-follow tips on WordPress blog optimization that you must know about.

#Tip 1: Choose a Lightweight Theme

Most of the bloggers, especially the ones tied to a low-development budget generally prefers using a free WordPress theme for their blog design. While this may help you setup a blog in just a matter of a few minutes, but the theme you’ve chosen might slow your blog down. That’s because, free to download themes usually contains unnecessary bloat that causes the blog to load slowly. But, carefully choosing a theme that contains only the essential design elements and components is the way to have a speedy WordPress blog.

#Tip 2: Post Original and Quality Content

Blog Optimization Tips Every Blogger

Time and again, Google has introduced updates to prevent use of duplicate content. Also, the search engine giant pays special attention to blog posts featuring quality content. The Google’s Panda update fuelled the need to write “original and high-quality content”. Of course, you wouldn’t have been affected by the Panda effect if you were using meaningful content in your blog. But, many people publishing crappy content onto their blogs and websites were slapped hard. Though, this isn’t something new but newbie bloggers might not be aware of the same. So, make sure to read Google’s guidelines first before writing and publishing your blog content.

#Tip3: Install the W3 Total Cache Plugin Onto Your Blog

Well, there couldn’t be a better way to boost your blog speed, then installing the W3 Total Cache plugin. A caching plugin loads the static HTML files rather than dynamic ones; since this does not require the execution of any PHP or MySQL commands, it reduces the web page’s load time.

W3 Total Cache Plugin

The W3 Total Cache plugin automatically optimizes the code of your blog, so as to make it load faster. Additionally, the W3 Total Cache helps optimize the server performance, reduces the download times drastically, and also offers integration with content delivery network (CDN). All these factors help in deploying enhanced user experience, which results in high conversion rates.

#Tip4: Create the Right Permalink Structure

Right Permalink Structure

Your blog’s URL that people enter in their browser to view your blog posts are called as permalinks. In fact, search engines use them for linking to your blog. You can find different variations of permalink structures, however, the most important ones to consider are:

yoursitedomain.com/post-name/

yoursitedomain.com/2015/7/12/post-name/

yoursitedomain.com/post-name/POSTID

From all of the above listed options, many argue that the first one is the best choice because of the following reasons:

  • It lets you make modifications to the “post-name”, in order to add a set of keywords to serve SEO need.
  • Avoiding to write date, helps in presenting the content in a new and relevant manner to the user.
  • It proves an effective way to remember lengthy post titles in the form of shared links.

#Tip5: Optimize The Images Of Your Blog For the Web

Images prove a viable means for increasing the engagement rate of the posts, and also help in getting your posts shared quite frequently across social channels. But, adding images take up plenty of storage space. And so, posts containing images may take more time to load. This is why it becomes important that the images, you’re including in your blog posts are optimized before uploading them to your blog or website.

Optimize The Images Of Your Blog

One best way to optimize images is to make use of the WP Smush.it – that make use of the Smush.it API for optimizing images saved in the JPEG format. Another great solution is to utilize the Lazy Load plugin – that loads the images only when a user clicks on the desired location.

#Tip6: Get Rid of the Unwanted Pingbacks and Trackbacks

WordPress comes loaded with a very useful feature that allows sites to send a notification (or trackback) when they link to any of your posts. But, in case you’re not careful, chances are that spammers may use this feature to gain links from your blog. And, in case you’ve chosen to display “pingbacks” and “trackbacks” in your blog theme, then spam users will continue to send “trackback” or “pingback” links that will get displayed in your theme.

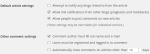
As a result, your blog will have a dozen of unnecessary pingbacks which will increase the size of your database files. And so, it is better to turn off the option that allows to receive notifications from other blogs in the form of trackbacks and pingbacks. To do so, head over to your WordPress admin dashboard screen and move to Settings → Discussion. This will open up the Default Settings dialog box, under which you’ll find the “Default article settings”. Corresponding to this setting, uncheck the option “Allow link notifications from other blogs (pingbacks and trackbacks)” as shown in the image below:

Unwanted Pingbacks and Trackbacks

And finally, click on the “Save changes” button provided at the bottom of your blog page.

#Tip7: Make Appropriate Use of “Social Media Buttons”

Social media buttons hold a significant value as they allow site visitors to share your content on social media networks. However, these buttons need to make calls to external links, which results in slowing down your website. You can make the blog pages load quickly, by adding social media buttons only for those social networks that is commonly accessed by your audience. For instance, if your users rarely access your LinkedIn account, and instead spend their time on Twitter, then its better to avoid including a LinkedIn button onto your blog pages.

Wrapping Up

Are you unable to drive enormous traffic to your WordPress powered blog? This could be because of the slow loading speed of your blog. But, reading the above mentioned tips will definitely help you find the right solution to tackle such an issue in the most efficient manner possible.

How to easily promote RSS feed through every post

If you have wordpress site and easily promote RSS feed in wordpress then you can use our simple code to add in functions.php file. RSS feed are important for every website.

easily promote RSS feed in wordpress

Open your functions.php file. you can find this file in your currently activated wordpress theme folder. just put following code in that file.


function wpapi_promote_feed($content,$class = "promote") {
echo $content; if (is_single()) {
?>
<div class="<?php echo $class; ?>">
<h3>Enjoyed this article?</h3> <p>Please consider subscribing to our
<a class="feed" href="<?php bloginfo('rss2_url'); ?>" title="Subscribe via RSS">RSS feed!</a>
</p> </div>
<?php } }

add_filter('the_content','wpapi_promote_feed');

Here I used “the_content” filter, which will add simple RSS subscriber link at bottom of your content. If you want to add custom image or CSS for link then you need to modify this code littlebit.

easily promote RSS feed in wordpress


How to stop trackback spam in wordpress

In wordpress CMS, Spam comments, Trackback and pinkback is big issue. Here in this article, I will give you some simple tips for stop spam in wordpress. For many bloggers and website owners, Spam trackback is really painful and serious issue.

How to stop trackback spam in wordpress

Pingbacks and trackbacks spam generated by spammers using automated scripts or program to send millions of trackbacks to websites all over the world. Just like comment spam, trackback spam is not directed to your site personally.

What is purpose of Trackback?

Trackbacks are not monitored as like comments so spammer thought. They will leave there links on our site. This is simple trick, used by many spammers.

Why Trackbacks are not good?

Through spam trackbacks, your website SEO will get affected. Most of these spam links point to illegal activities like selling drugs, running scams, distributing malicious code, etc.

Stop TrackBack and Pingback using WordPress setting

Go to WordPress admin page, Than Settings » Discussion section. In “Default article settings” section you will find following checkbox. (As shown in following Picture)

How to stop trackback spam in wordpress

Uncheck “ ” checkbox. This setting will stop or disable trackback and pings to your wordpress site.

More Extra security

https://wordpress.org/plugins/akismet/ – Akismet

Akismet checks your comments against the Akismet Web service to see if they look like spam or not and lets you review the spam it catches under your blog’s “Comments” admin screen.

Major features in Akismet include:

  • Automatically checks all comments and filters out the ones that look like spam.
  • Each comment has a status history, so you can easily see which comments were caught or cleared by Akismet and which were spammed or unspammed by a moderator.
  • URLs are shown in the comment body to reveal hidden or misleading links.
  • Moderators can see the number of approved comments for each user.
  • A discard feature that outright blocks the worst spam, saving you disk space and speeding up your site.

How to customize Comment Count Text in wordpress

Some people asked me about changing the default wordpress comment template and comment count text. If you are wordpress developer than it is easy.

customize Comment Count Text in wordpress

You can customize the text for displaying comments number or count inside loop. This is just a simple template edit however it is extremely useful if you are creating a theme that is not a traditional theme or you wanted to inject a little bit of personality into the site.

You just need to copy and paste following code into comments.php file.

Using  following code you can change:

<?php
    echo get_comments_number_text( "No thoughts, yet", "One Thought only", "% thoughts");
?>

wordpress-comment-count

There are some useful articles about wordpress comments customization:

disable comments in wordpress pages and posts

Turn of comment in wordpress site is easy. Using setting or plugin you can disable comments completely in wordpress. We will give simple steps for doing this.

disable comments in wordpress

It is quite simple. Go to wordpress admin panel. Navigate to Setting->Discussion. First section will be “Default article settings“. We have three checkboxs there. Uncheck “” checkbox. It will look like as follows.

Settings >> Discussion >> uncheck “Allow people to post comments on new articles”

disable comments in wordpress

This setting change will comments “turned off” by default.

Note: This applies to new posts that you will publish from now on. To disallow comments from already publish posts:

Posts >> select them all and “Edit” under bulk actions and hit apply >> choose “do not allow” next to comments and hit update posts.

Solution: If you have old posts and pages and if you want to disable comments than use following wordpress plugin.

Disable Comments

Allows administrators to globally disable comments on their site. Comments can be disabled according to post type. Multisite friendly.

disable comments wordpress plugin setting

This plugin allows administrators to globally disable comments on any post type (posts, pages, attachments, etc.) so that these settings cannot be overridden for individual posts. It also removes all comment-related fields from edit and quick-edit screens. On multisite installations, it can be used to disable comments on the entire network.

Additionally, comment-related items can be removed from the Dashboard, Widgets, the Admin Menu and the Admin Bar.

Important note: Use this plugin if you don’t want comments at all on your site (or on certain post types). Don’t use it if you want to selectively disable comments on individual posts – WordPress lets you do that anyway. If you don’t know how to disable comments on individual posts, there are instructions in the FAQ.


how to show user post count in wordpress

Many people asked me, how to show specific users post count in wordpress widget area. Here in this article, We will give you code and trick for showing user post count in widget area.

There is inbuilt wordpress method called “count_user_posts” which will help you to show users post or page or custom post count in your wordpress theme. Since wordpress 3.0 version this method exits in API. You can use “count_user_posts” method for many purpose. You can pass two parameters to this function, If you did not pass second parameter than it will be post.

Here we given some samples:

echo count_user_posts(1,'post');             // posts
echo count_user_posts(2,'page');             // pages
echo count_user_posts(3,'products'); // custom post types

show user post count in wordpress

We used above method for showing post count as follows:

show user post count in wordpress

I used PHP Code Widget plugin for adding PHP code in widget section.

More about PHP Code Widget

The normal Text widget allows you to insert arbitrary Text and/or HTML code. This allows that too, but also parses any PHP code in the text widget and executes it.

This can make it easier to migrate to a widget-based theme. However, this plugin should not be used long term, as anybody with access to edit the widgets on your site will be able to execute arbitrary PHP code.

All PHP code must be enclosed in the standard php opening and closing tags ( <?php and ?> ) for it to be recognized and executed.

Only users with the unfiltered_html role will be allowed to insert unfiltered HTML. This includes PHP code, so users without admin or editor permissions will not be able to use this to execute code, even if they have widget editing permissions.

How used following code in PHP widget.


<?php printf( __( 'Number of posts published by user: %d', 'text-dom-here' ), count_user_posts( 1 ) ); ?>

programmatically create wordpress page using theme code

Many times client want predefined page in wordpress site when theme is activated. Here in this wordpress tutorial, we will show you how to programmatically create page or posts in wordpress website.

programmatically create wordpress page

If you want to create custom page with content than you can use following code. You just need to open “functions.php” file. (File can be found in theme folder).


if (isset($_GET['activated']) && is_admin()) {
$new_page_template = ''; //ex. template-custom.php. Leave blank if you don't want a custom page template.

//don't change the code bellow, unless you know what you're doing
$page_check = get_page_by_title('This is the page custom title');
$new_page = array(
'post_type' => 'page',//define post or page
'post_title' => 'This is the page custom title',
'post_content' => 'This is the page custom content',
'post_status' => 'publish',
'post_author' => 1,
);
if(!isset($page_check->ID)){
//create page in wordpress
$new_page_id = wp_insert_post($new_page);
if(!empty($new_page_template)){
update_post_meta($new_page_id, '_wp_page_template', $new_page_template);
}
}

}

You just need to copy and paste above code into functions.php file. This will create custom page in wordpress website. programmatically created page will look like as follows:

programmatically create wordpress page

programmatically create wordpress post

If you want to create wordpress post programmatically than use following code.


if (isset($_GET['activated']) && is_admin()) {
$new_page_template = ''; //ex. template-custom.php. Leave blank if you don't want a custom page template.

//don't change the code bellow, unless you know what you're doing
$page_check = get_page_by_title('This is the page custom title');
$new_page = array(
'post_type' => 'post',//define post or page
'post_title' => 'This is the page custom title',
'post_content' => 'This is the page custom content',
'post_status' => 'publish',
'post_author' => 1,
);
if(!isset($page_check->ID)){
//create page in wordpress
$new_page_id = wp_insert_post($new_page);
if(!empty($new_page_template)){
update_post_meta($new_page_id, '_wp_page_template', $new_page_template);
}
}

}

You need to copy and paste above code in to functions.php file. With above code you can create custom post type’s post programmatically.

how to add and remove wordpress user roles

In wordpress we can extend user role management system. Here in this wordpress tutorial, we will show to add and remove wordpress user roles. There are some free wordpress plugins which will give you option to edit wordpress role system.

Here are some plugins which will extend wordpress role management.

User Role Editor

With User Role Editor WordPress plugin you can change user role (except Administrator) capabilities easy, with a few clicks. Just turn on check boxes of capabilities you wish to add to the selected role and click “Update” button to save your changes. That’s done. Add new roles and customize its capabilities according to your needs, from scratch of as a copy of other existing role. Unnecessary self-made role can be deleted if there are no users whom such role is assigned.

Role assigned every new created user by default may be changed too. Capabilities could be assigned on per user basis. Multiple roles could be assigned to user simultaneously. You can add new capabilities and remove unnecessary capabilities which could be left from uninstalled plugins. Multi-site support is provided.

User Role

The User Role plugin allows you to change wordpress role capabilities. It is a very useful tool when your site has a bunch of visitors or subscribers. The plugin has intuitive and convenient interface so all the site visitors can be easily sorted by roles with a couple of clicks.

  • Actions: You can recover wordpress role capabilities.
  • Interface: Recover button has confirmation dialogue, so that you won’t reset your settings ocasionaly.
  • Display: All role capabilities are separated into groups.

WPFront User Role Editor

This plugin allows you to easily manage user roles within your WordPress site. You can create, edit or delete user roles and manage role capabilities.

Features

  • Create new roles.
  • Edit or rename existing roles.
  • Clone existing roles.
  • Manage capabilities.
  • Allows you to add role capabilities.
  • Change default user role.
  • Restore role.
  • Assign multiple roles.

Manual Way to Extend WordPress User management system

Using following Code You can Add or Remove wordpress role.

We added “Owner” role in wordpress. For adding new role use following code.


function wpapi_add_role() {
add_role( 'owner', 'Owner',
array(
'read',
'edit_posts',
'delete_posts',
)
);
}
add_action( 'init', 'wpapi_add_role' );

add and remove wordpress user roles

Remove existing worpdress roles, Use following code.


function wpapi_remove_role() {
remove_role( 'editor' );
remove_role( 'author' );
remove_role( 'contributor' );
remove_role( 'subscriber' );
}
add_action( 'init', 'wpapi_remove_role' );

If you want to know more about worpdress roles and capabilities than visit this page. Check “Capability vs. Role Table” section. which is important for developers.

add youtube subscribe button to wordpress website

Many bloggers have youtube channel now days. Here in this wordpress tutorial we will show you to add youtube subscribe button to your website. Creating social presence through youtube is really futuristic way. So if you do not have your own youtube channel than create it. Put your ideas and thoughts through videos.

Steps for adding youtube subscription button to wordpress

Using following worpdress plugin you can easily add youtube subscibe button.

YouTube Subscribe Button

Adds the YouTube Subscribe Button to your website.

It adds a widget to your blog that will display the YouTube Subscribe Button. The button lets people subscribe to your YouTube channel without having to leave your site to either log in to YouTube or confirm their subscriptions.

How to use this plugin?

Go to Appearance->Widgets section. You will find “Youtube Subscription Button”  widget there. Drag and drop this widget to your sidebar or your chosen place. This has following setting.

youtube-subscribe-Widgets

We found this plugin very helpful and handy.

Manual Way to add youtube subscribe button

If you want to add youtube subscribe button to your wordpress theme than use following steps. Go to following youtube social button configuration page.

YouTube Subscribe Button
 

You will see following setting and options on page.

YouTube-Subscribe-Button-samples


In “Configure a button” section just add your channel name and and copy text from “code” text area. That will be as follows:


<script src="https://apis.google.com/js/platform.js"></script>

<div class="g-ytsubscribe" data-channel="purabdk" data-layout="default" data-count="default"></div>

Just use above code in your theme files. There are many styles and options you will find on this page. Choose style and color as per your wordpress theme and use in your theme code.

Using above technique you will increase your youtube channel subscribers through your wordpress blog or website.

WordPress Tutorial Add Social Buttons in RSS Feed

Adding social buttons to wordpress RSS feed is always good for SEO and it will increase your website visibility to other users. we have steps for adding social buttons to RSS feed.

How to Add Social Buttons in RSS Feed

Wordpress Tutorial Add Social Buttons in RSS Feed
WordPress Tutorial Add Social Buttons in RSS Feed


Why social share buttons are important in RSS feed.

RSS feed is super great feature for publishing news to multiple search engine and news site. Through RSS feed your website will viewable to many of people. You may be seen already, some of popular news and bigger websites are showing share buttons in RSS feed. So through RSS feed you can share your articles to social media sites.


Using following simple code snippet you can add RSS feed share buttons to wordpress RSS feed.

// add custom feed content
function wpapi_add_feed_content($content) {

// Check if a feed is requested
if(is_feed()) {

// Encoding post link for sharing
$permalink_encoded = urlencode(get_permalink());

// Getting post title for the tweet
$post_title = get_the_title();

// Content you want to display below each post
// This is where we will add our icons

$content .= '<p>
<a href="http://www.facebook.com/sharer/sharer.php?u=' . $permalink_encoded . '" title="Share on Facebook"><img src="http://images.purabtech.in/twitter-32x32.png" title="Share on Facebook" alt="Share on Facebook" width="64px" height="64px" /></a>

<a href="http://www.twitter.com/share?&text='. $post_title . '&amp;url=' . $permalink_encoded . '" title="Share on Twitter"><img src="http://images.purabtech.in/facebook-32x32.png" title="Share on Twitter" alt="Share on Twitter" width="64px" height="64px" /></a>
</p>';
}

return $content;
}

add_filter('the_excerpt_rss', 'wpapi_add_feed_content');
add_filter('the_content', 'wpapi_add_feed_content');

I Downloaded free share icons from following URL:
http://www.blogperfume.com/new-27-circular-social-media-icons-in-3-sizes/

Here in this example code we used facebook and twitter share buttons which are most popular social sites in the world.